
Use Python Regex to automate extracting staff change emails
I receive email notifications alerting me of new hires and new terms immediately when HR team enters staff information in their system. It is hard to stay on top of all changes when emails arrive at random times. A data table consolidating all these staff changes is the best way for me to keep track of the latest addition or subtraction to my firm’s headcount. But I don’t want to waste time copying data from these system-generated emails into a spreadsheet. Luckily, Python has a built-in package re to work with Regular Expressions that could help out significantly.
I. Automate TERM Alerts
To the right is an example of a Termination email alerting the upcoming departure of a team member. The nice thing is that all data fields in Employee Information are organized in a standardized format, using standardized key works, which is critical to automation capability.
We will refer to this as Snapshot 1

First, I need to peek at the email body’s content as it might contain characters that are not visible in the outlook email itself.
import win32com.client
import datetime
import pandas as pd
import re

def access_outlook_emails_term_noti():
    # Create Outlook application object
    outlook_app = win32com.client.Dispatch('Outlook.Application')

    # Get Namespace
    namespace = outlook_app.GetNamespace("MAPI")

    # Get Inbox folder
    inbox = namespace.GetDefaultFolder(6)  # 6 corresponds to the Inbox folder

    # Specify subfolder name
    subfolder_l2_name = "1.2 New Hire - New Term"
    subfolder_l1_name = "1. STAFFS"

    try:
        # Get the "New Hire" subfolder
        subfolder_l1 = inbox.Folders[subfolder_l1_name]
        subfolder_l2 = subfolder_l1.Folders[subfolder_l2_name]

    except Exception as e:
        print(f"Error accessing subfolder: {e}")
        return

    # Sender and title criteria
    sender_email = 'hr@thefirm.com'
    email_title_keyword = 'Leaving The Firm'

    # List to store email bodies
    email_bodies = []

    # Counter to limit the loop to 5 emails
    email_counter = 0

    # Iterate through items in the subfolder
    for item in subfolder_l2.Items:
        # Check if the item is a mail item
        if item.Class == 43:  # 43 corresponds to MailItem
            # Check sender and title criteria
            if (sender_email.lower() in item.SenderEmailAddress.lower()
                and item.Subject.lower().startswith(email_title_keyword.lower())):

                # Peek into content of selected email body
                # Append the email body to the list
                email_bodies.append(item.Body)
                print(item.Body)

                 # Increment the counter
                email_counter += 1

                # Break out of the loop if the counter reaches 5
                if email_counter >= 5:
                    break

    # Return the list of email bodies
    return email_bodies

access_outlook_emails_term_noti()
Here is what the print(item.body) function prints out, which we will refer to as Snapshot 2

Each row seems to follow very similar patterns and could use the same starting point r'{key word} :\s*(.+?)$'.
However, when I applied this regex structure to the first key word {Employee Name}, I didn’t get the phrase I was expecting. Instead, the output contains redundant info like {Employee ID} and {Last Day Worked} that seems to be an unwanted run-on after {first name, last name} is extracted.
Initial output didn’t stop after {First Name, Last Name}
The biggest difference between the 2 snapshots above is the extra incomplete paragraph at the beginning of Snapshot 2 that is not visible to readers when they open Outlook email. Since this part is useless, we will ignore them and only focus on the main part where employee information is presented in lines starting with bullet points.
To extract the information of departing employees I want to use regex to identify each row starting with “* {key word} :” then extract all characters after “:” up until hitting row end, or for the case of {Last Day Worked} and {Last Day Employment}, before the “(m/d/y)” phrase.
Then I realized that the extract is capturing the information from the redundant paragraph at the beginning of Snapshot 2 (highlighted above). Thus, I need to signify that I want info extraction to occur in lines starting with a bullet point “* Employee Name”
This regex structure then works as expected: r'\*\tEmployee Name:\s*(.+?)$'
Similar pattern can be used successfully for other key words, except for ‘Work Location’. This is because when I investigate the html source code, there are special characters “\u200b” after bullet point “*\t” and before {Work Location}. “\u200b” is a Unicode character known as the "Zero Width Space" (ZWSP).
After a lot of trials and errors, the fastest way to make it work is to exclude the bullet point mark “*” in search pattern.
The final codes that capture all information I need from HR notification emails and put it in a nice dataframe format is below:
import win32com.client
import datetime
import pandas as pd
import re

def extract_employee_information_term_noti(body):
    # Define regular expressions for extracting information
    structure = {

        'employee_name': r'\*\tEmployee Name:\s*(.+?)$',

        'employee_id': r'\*\tEmployee ID:\s*([\w]+)\s*$',

        'employment_type': r'\*\tEmployment Type:\s*(.+?)$',

        'last_day_worked': r'\*\tLast Day Worked:\s*([^(\n]+?)(?=\s*\(m/d/y\)|$)',

        'last_day_employment': r'\*\tLast Day of Employment:\s*([^(\n]+?)(?=\s*\(m/d/y\)|$)',

        'department': r'\*\tDepartment:\s*(.+?)$',

        #Work Location has special "Zero Width Space" (ZWSP) after *tab
        'work_location': r'Work Location:\s*(.+?)$',

        'manager': r'\*\tManager:\s*(.+?)$',

        'personal_email': r'\*\tPersonal Email:\s*(.+?)$',

        'company_email': r'\*\tCompany Email:\s*(.+?)$'
    }

    # Initialize dictionary to store extracted information
    employee_info = {}

    # Iterate over patterns and extract information for each line
    for key, pattern in structure.items():
        match = re.search(pattern, body, re.MULTILINE)
        if match:
            # Get the captured group from the match
            employee_info[key] = match.group(1).strip()

    return employee_info

def access_outlook_emails_term_noti():
    # Create Outlook application object
    outlook_app = win32com.client.Dispatch('Outlook.Application')

    # Get Namespace
    namespace = outlook_app.GetNamespace("MAPI")

    # Get Inbox folder
    inbox = namespace.GetDefaultFolder(6)  # 6 corresponds to the Inbox folder

    # Specify subfolder name
    subfolder_l2_name = "1.2 New Hire - New Term"
    subfolder_l1_name = "1. STAFFS"

    try:
        # Get the "New Hire - New Term" subfolder
        subfolder_l1 = inbox.Folders[subfolder_l1_name]
        subfolder_l2 = subfolder_l1.Folders[subfolder_l2_name]

    except Exception as e:
        print(f"Error accessing subfolder: {e}")
        return

    # Sender and title criteria
    sender_email = 'hr@thefirm.com'
    email_title_keyword = 'Leaving The Firm'

    # Create an empty dictionary to store email information
    email_data = {'Subject':[],                 'Received':[],
                  'Employee Name':[],           'Employee ID':[],
                  'Employment Type':[],
                  'Last Day Worked': [],        'Last Day of Employment':[],
                  'Department':[],              'Work Location': [],
                  'Manager':[],                 'Personal Email':[],
                  'Company Email':[]}

    # Iterate through items in the subfolder
    for item in subfolder_l2.Items:
        # Check if the item is a mail item
        if item.Class == 43:  # 43 corresponds to MailItem
            # Check sender and title criteria
            if (sender_email.lower() in item.SenderEmailAddress.lower()
                and item.Subject.lower().startswith(email_title_keyword.lower())):

                # Extract employee information from the email body
                employee_info = extract_employee_information_term_noti(item.Body)

               # Append email information to the Dictionary
                email_data['Subject'].append(item.Subject)
                email_data['Received'].append(item.ReceivedTime.strftime('%Y-%m-%d %H:%M:%S') if item.ReceivedTime else None)
                email_data['Employee Name'].append(employee_info.get('employee_name', None))
                email_data['Employee ID'].append(employee_info.get('employee_id', None))
                email_data['Employment Type'].append(employee_info.get('employment_type', None))
                email_data['Last Day Worked'].append(employee_info.get('last_day_worked', None))
                email_data['Last Day of Employment'].append(employee_info.get('last_day_employment', None))
                email_data['Department'].append(employee_info.get('department', None))
                email_data['Work Location'].append(employee_info.get('work_location', None))
                email_data['Manager'].append(employee_info.get('manager', None))
                email_data['Personal Email'].append(employee_info.get('personal_email', None))
                email_data['Company Email'].append(employee_info.get('company_email', None))

    # Create DataFrame from the collected email information previously stored as dictionary
    df = pd.DataFrame(email_data)
    return df

### RUN FUNCTIONS
#Add column Department Code by extracting first 3 digits of "department name"
df_new_term = access_outlook_emails_term_noti()
df_new_term["Department Code"] = df_new_term["Department"].apply(lambda x: "(None)" if "(None)" in x else x[:3])

# Sort DataFrame by "Receive Time"
df_new_term_sorted_by_receive_time = df_new_term.sort_values(by='Received', ascending=False)
#display(df_new_term_sorted_by_receive_time)
II. Automate New Hire Alerts
To the right is an example of a New Hire email alerting the upcoming joining of a team member. The nice thing is that all data fields in Employee Information are organized in a standardized format, using standardized key works, which is critical to automation capability.
However, data is put into a table as opposed to bullet points in Term notifications.
We will refer to this as Snapshot 3

Similar to part I Term email, I went through the same process with part II New Hire email:
(1) Read the body content in both normal and html formats to get a sense of text structure
(2) Play around with Regex pattern to ensure that the exact phrase is captured
(3) Loop through all New Hire emails, extract the wanted data, then put it in data frame
Here is what the print(item.body) function prints out, which we will refer to as Snapshot 4
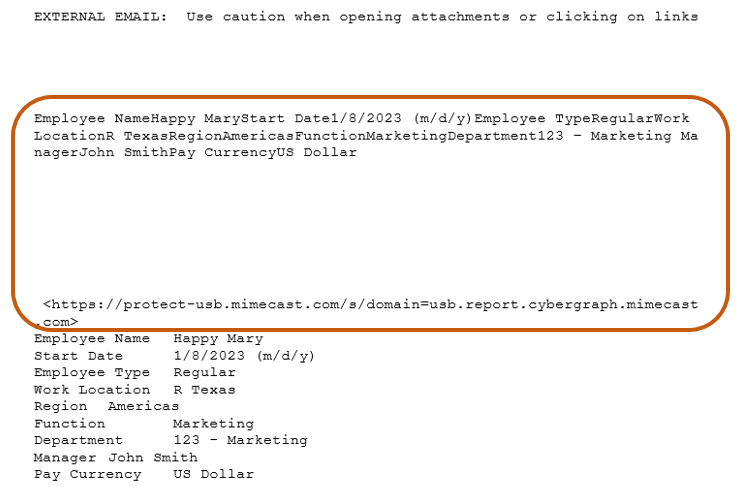
The biggest difference between snapshot 3 and 4 is the extra paragraph at the beginning of Snapshot 4 that is not visible to readers when they open Outlook email which is Snapshot 3. Since this part is useless, we will ignore them and only focus on the main part where employee information is presented in lines starting with bullet points.
There is no bullet point “*” to start a new data column in this case as data is organized in a table, which are separated by “\t” and “\r” if we look into the html structure of the content.

The final codes that capture all information I need from HR notification emails and put it in a nice dataframe format is below:
import win32com.client
import datetime
import pandas as pd
import re

def access_outlook_emails_new_hire_noti():
    # Create Outlook application object
    outlook_app = win32com.client.Dispatch('Outlook.Application')

    # Get Namespace
    namespace = outlook_app.GetNamespace("MAPI")

    # Get Inbox folder
    inbox = namespace.GetDefaultFolder(6)  # 6 corresponds to the Inbox folder

    # Specify subfolder name
    subfolder_l2_name = "1.2 New Hire - New Term"
    subfolder_l1_name = "1. STAFFS"

    try:
        # Get the "New Hire - New Term" subfolder
        subfolder_l1 = inbox.Folders[subfolder_l1_name]
        subfolder_l2 = subfolder_l1.Folders[subfolder_l2_name]

    except Exception as e:
        print(f"Error accessing subfolder: {e}")
        return

    # Sender and title criteria
    sender_email = 'hr@thefirm.com'
    email_title_keyword = 'New Hire'

    # Create an empty dictionary to store email information
    email_data = {'Subject':[],                 'Received':[],
                  'Employee Name':[],           'Start Date':[],
                  'Employee Type': [],          'Work Location':[],
                  'Region':[],                  'Function': [],
                  'Department':[],              'Manager':[],
                  'Pay Currency':[]}

    # Iterate through items in the subfolder
    for item in subfolder_l2.Items:
        # Check if the item is a mail item
        if item.Class == 43:  # 43 corresponds to MailItem
            # Check sender and title criteria
            if sender_email.lower() in item.SenderEmailAddress.lower() and email_title_keyword.lower() in item.Subject.lower():

                # Extract employee information from the email body
                employee_info = extract_employee_information_new_hire_noti(item.Body)

                # Append email information to the Dictionary
                email_data['Subject'].append(item.Subject)
                email_data['Received'].append(item.ReceivedTime.strftime('%Y-%m-%d %H:%M:%S') if item.ReceivedTime else None)
                email_data['Employee Name'].append(employee_info.get('employee_name', None))
                email_data['Start Date'].append(employee_info.get('start_date', None))
                email_data['Employee Type'].append(employee_info.get('employee_type', None))
                email_data['Work Location'].append(employee_info.get('work_location', None))
                email_data['Region'].append(employee_info.get('region', None))
                email_data['Function'].append(employee_info.get('function', None))
                email_data['Department'].append(employee_info.get('department', None))
                email_data['Manager'].append(employee_info.get('manager', None))
                email_data['Pay Currency'].append(employee_info.get('pay_currency', None))

    # Create DataFrame from the collected email information previously stored as dictionary
    df = pd.DataFrame(email_data)
    return df

### RUN FUNCTIONS
#Add column Department Code by extracting first 3 digits of "department name"
df_new_hire = access_outlook_emails_new_hire_noti()
df_new_hire["Department Code"] = df_new_hire["Department"].apply(lambda x: "(None)" if "(None)" in x else x[:3])

# Sort DataFrame by "Receive Time"
df_new_hire_sorted_by_receive_time = df_new_hire.sort_values(by='Received', ascending=False)
#display(df_new_hire_sorted_by_receive_time)
Now the last thing to do is to write the results out to an Excel spreadsheet with 2 separate tabs: one for “New Hire” and the other for “New Term”
# Save the DataFrame to an Excel file with today's date in the file name
current_datetime = datetime.datetime.now()

# Format the date as YYYY-MM-DD
today_date = current_datetime.strftime("%Y-%m-%d")

# Put today's date in file path
excel_file_path = f'C:/My Drive/Email Noti Extracts/Term_Hire_employee_info_{today_date}.xlsx'

# Create an Excel writer object
with pd.ExcelWriter(excel_file_path, engine='xlsxwriter') as writer:

    # Write New Term DataFrame to a tab in Excel
    df_new_term_sorted_by_receive_time.to_excel(writer, sheet_name='New Term', index=False)

    # Write New Hire DataFrame to a tab in Excel
    df_new_hire_sorted_by_receive_time.to_excel(writer, sheet_name='New Hire', index=False)

# Display the Excel file path
print(f"Excel file saved to: {excel_file_path}")
So now I have a complete code snippet that automates extracting staff changes data from random emails coming into my inbox, consolidating them in an organized Excel spreadsheet whenever I want.